The word “pin” has the broadest applications, including brooches and fibulas. Bone thorns, copper, iron, brass, and gold are just some materials used to make essential pins throughout history and worldwide.
You can think of an accessory as anything you add to what you’re already wearing. The success of any accessory depends on how well it enhances your sense of style, the current fashion trend, and the surrounding circumstances.
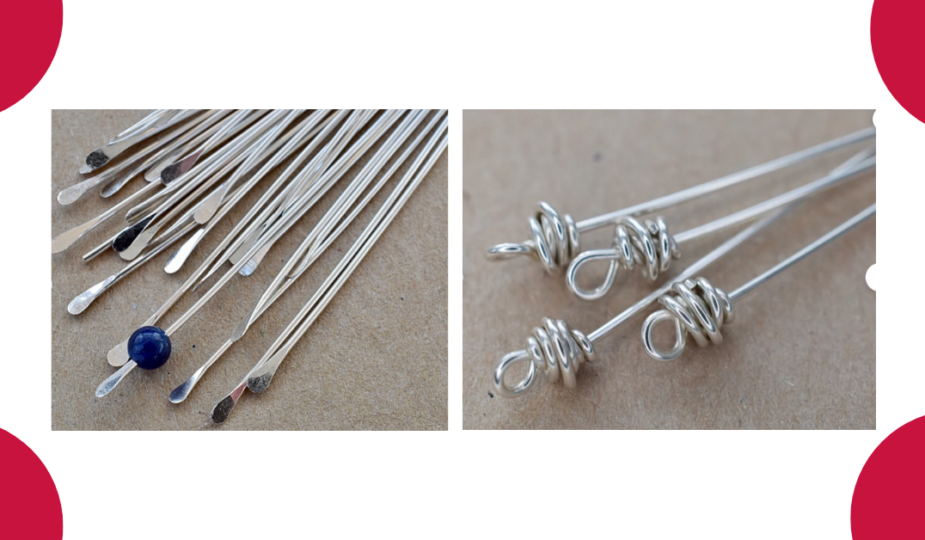
Head pins, eye pins, and paddle pins fall into two categories: practical and decorative.
Closures and fasteners have traditionally been considered reasonable, focusing on clothes that can be worn on the body or held together by a clasp or clip. If you’ve never seen these up close before or want to learn more about how to use them in craft, read more about pins here.
As personal ornamentation, they were also intended to convey thoughts about the wearer and the time and place they were worn. The word “pin” has the broadest applications, including brooches and fibulas.
On the other hand, pins and brooches have a broader historical scope than fibula, with a more narrowly defined historical purpose. The pin’s more comprehensive fastening function connects all three.
Women today wear brooches as solely decorative jewelry items, although these fasteners had no gendered implications in the past. Even though “brooch” and “pin” were used interchangeably in the early 2000s for jewelry, pins were usually considered to be minor, sharp metal-wire fasteners used in sewing and tailoring procedures unless altered by a distinguishing prefix such as “hatpin.” One simple project for beading for beginners using head pins is to make a pair of beaded earrings.
Pins: A Quick History Of Clothing Accessories
To secure cloth, pins are defined as straight cylindrical pieces of metal with sharp points at one end and a blunt head. Bone thorns, copper, iron, brass, and gold are just some of the materials used to make essential pins throughout history and worldwide.
Gemstones and other jewelry techniques have been employed to create period-appropriate designs on the heads of more oversized, specialized pins, such as hatpins, tiepins, and hairpins used as dress accessories.
Long and intricate nails were used in the seventeenth and eighteenth centuries to hold European and American women’s hats to their hair during the Victorian and early twentieth century. Starting a new hobby of crafting with head pins can be a fun and affordable way to express your creativity. Starting a new hobby of crafting with head pins can be a fun and affordable way to express your creativity. This hatpins collection may be considered exquisite miniature sculptures because of their unique combination of materials.
On the other hand, straight pins with a flat head have long been used as fasteners for women’s clothing to dress well. For example, a woman in the Renaissance would have been fastened into her bodice instead of laced or buttoned for a tight, smooth fit.
Aprons, for example, were commonly fastened to women’s outerwear during many periods in history. For instance, women and girls of the 19th century wore “pinafores” to protect their clothing from getting stained while working or playing. It’s a modern example of the old-style pins worn to identify oneself as belonging to a specific ethnic group.
Sword-shaped pins adorned with Celtic motifs or cultural artifacts such as the hawthorn secure the traditional plaid kilts worn by the people of Ireland, the United Kingdom, and Wales. Clan badges can also be added to kilt pins to show the wearer’s lineage.
How To Make Your Decorative Jewelry Pins?
Beaders learn to utilize head pins, eye pins, and paddle pins when they start crafting jewelry. From simple earrings to elaborate necklaces and bracelets, you’ll use them.
It is possible to produce dangles and pendants using head pins with a flat head on one end. Eye pins include a loop on one end to make pendants, dangles, and links. They can also be used as links.
The flattened head of a paddle head pin prevents the beads from slipping off, making it both a beautiful and functional design element. Simple and wrapped loops can be used to finish both.
● Basic head pins: A basic head pin comprises of just a simple wire with one main loop. Make this as large or as tiny as you wish, and keep in mind that the loop might be used to tie something else to the string.
● Loop head pins: Most pins have a slight bend. Before cutting the wire, pulling it between your fingers a few times is good to straighten it up a bit. It’s much easier to stretch a long piece of wire than to straighten a short bead wire. It is preferable to have an excessively long wire than an insufficiently long piece of wire.
● Propeller head pins: To make a propeller end headpin, turn the end of the propeller at 90˚, approximately three to four inches from the end. Use your pliers to wrap them back straight to the center.
Work the wire from the opposite end, while keeping your pliers close to the angle, turn the surplus wire back to the center. Remove any excess you’re your cutter. Private tutoring can help students learn how to craft with head pins safely and effectively.It has coiled head pins. This style is made by wrapping the wire around an inner cylinder several times. Push end of the wire back into the coil so that it doesn’t produce a rough surface.
This occurs when you pull and twist the coil to obtain the visual effect you like. Unless you adjust the coil such that the top goes into the bead is in the middle of the coil, the top of the coil will be skewed. This is accomplished by making two right angles with the beading wire so that it emerges straight up from the center of the coil.
● Swirl head pins: The end of this creative headpin is adorned with a swirl! The key is to finish the spiral at a straight angle so that the pin component of the wire emerges from the center of the swirl. If you don’t, the swirl will appear skewed and challenging to see on the bead.
● Ball head pins: To make this style, ball the ends of the wire together with a flame. Keep the end of the precut headpin dipped in the flame close to the cone until it turns red hot and forms balls. Into the quench first and then into the pickle after that.